It is always mandatory to create a backup before making any changes to any server. If you do not have a backup: Purchase the IONOS Cloud Backup, follow the installation instructions, and complete a manual backup (video).
Table of Contents
- Choosing The Right Provider
- Choosing The Right Server
- Accessing Plesk and Adding Domain
- Configuring Your Own Name Server (optional)
- Updating Hostname
- Adding The IPv6
- Pointing DNS
- Set the Reverse DNS (PTR)
- Editing the Firewall Policy
- Enabling the SMTP Server
- Enable Spam Filters
- Further Reading
Why Not Use a Free/Paid Email Provider?
Before we start, it’s important to understand what you are about to get yourself into. Running an email server is a full-time system administrator’s job. If you are not a system admin, or do not have one employed, you are probably barking up the wrong tree. If you are not an expert on DNS, following documentation, and CLI, you are way better off using a service already established, such as IONOS Mail Business (50 GB Mailbox for $5/mo).
Why Consider Using a Free/Premium Email Provider?
- Because if you do not follow rules and policies your emails will be delivered into Spam, or worse, your domain, and/or server’s IP address will be blacklisted.
- Because you may not have hours and days to learn system administration and email server configuration.
- Because you are only using it for one personal business email or domain, and need 100% email deliverability from the start without tinkering.
As a free alternative, I recommend Mail.com.
None the less, there are many benefits to running your own email server as well, such as ultimate privacy and control of your emails. After heeding my warning, if you still wish to continue with setting up your own email server, follow along!
Choosing The Right Provider
IONOS is an inexpensive web hosting company with quality services, including dedicated servers, cloud servers, and VPS. They offer services throughout the world and have some of the best prices on the internet. Exclusively, they have the best price on the internet for Plesk Web Host Edition for their servers. For $5/month you get the unlimited reseller edition of Plesk (priced $35.50/month from Plesk.com).
Plesk is a web hosting control panel that gives a web browser interface to interact with the server. For example: adding domains, creating databases, and installing WordPress. Behind the scenes, Plesk is owned by the same company as cPanel, and does a lot of the same things that cPanel does, often better.
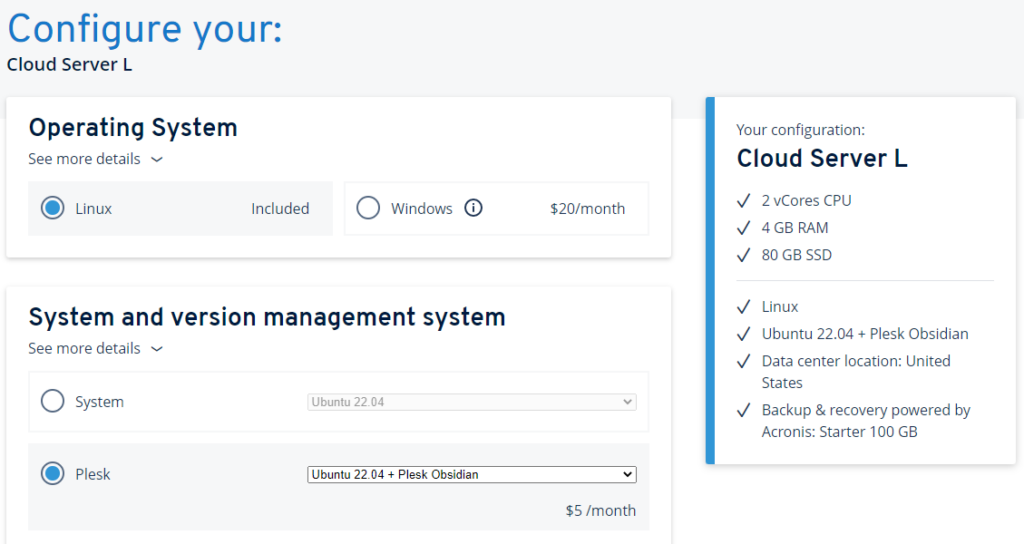
Plesk can be chosen during the installation of any IONOS server, for many operating systems: Windows Server 2019, Ubuntu 22.04, CentOS 7, Debian 11, and some others. Only if you choose Plesk during the deployment or reimaging of a server do you get the $5/month unlimited license through IONOS. Scrolling beyond the System and version management system you will also see options for different data center locations (US, UK, Germany, or Spain). Lastly, you will spot Backup & recovery powered by Acronis. Choosing a backup package during this step is extremely recommended for several reasons:
- Having a daily backup is the #1 line of defense for servers against malware, viruses, and intrusions, and always will be.
- Having a backup is the quickest way to move your data to a new server in the case of a hardware failure (ie. dead hard drive).
- The IONOS Cloud Backup is powered by Acronis, one of the largest backup and security software companies in the world.
- If you choose the backup package during the deployment/order of a server, it will automatically install the backup agent on the server for you. If you decide to add this backup later, you will need to manually install it (via SSH if it’s Linux).
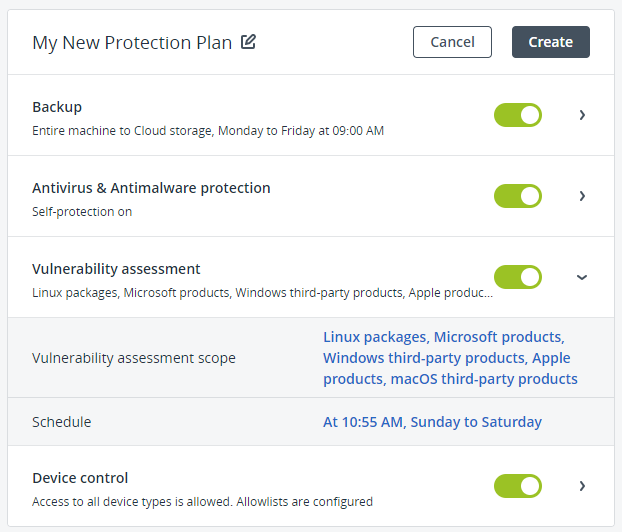
- The Cloud Backup utility is constantly being updated, and also offers vulnerability protection.
Choosing The Right Server
A root dedicated server is required in order to install an email server application, and they come in two different flavors:
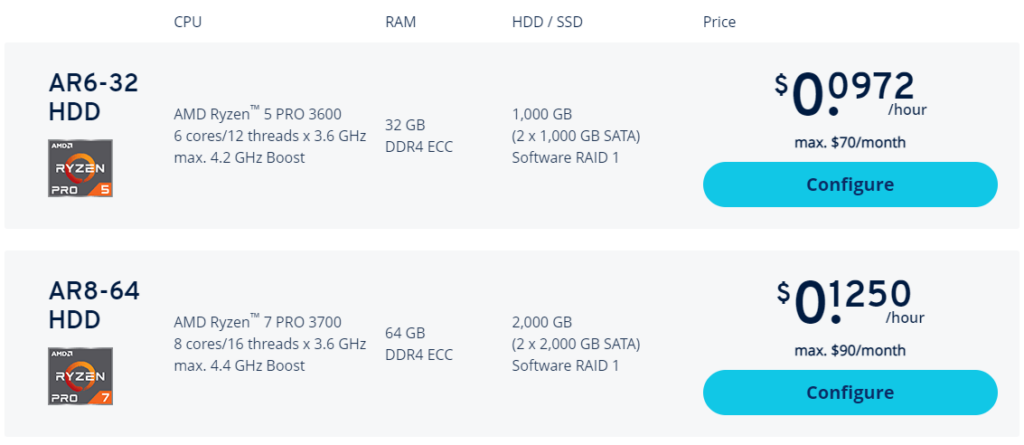
- Dedicated Server (AMD, Intel, or ‘Server Deals‘). A full dedicated server sits on a rack within a datacenter and has the same possibility of hardware issues that you may incur on your home PC. A dead motherboard, a loose ethernet cord, a fried NIC. Although these are rarer, they can happen. What is not rare however is a dead hard drive. HDDs are the oldest in server hard drive technology, and they will fail somewhere between 6 month-4 years old. SSDs are newer, faster, and last longer. NVMes are even newer, faster, and last even longer. With advantages come price increases.
If you are not familiar with running hard drive health tests on some interval (monthly), then it’s only a matter of time until your server stops working. If you do catch a hard drive prior to failure, you can plan the replacement with your provider (free of charge), but it still is a pain in the butt with rebuilding RAID, and reinstalling the bootloader. In the case that you don’t have your disks in RAID, or both disks died, then you also have to restore from a backup.
Most dedicated servers with IONOS come with unlimited 1Gbps bandwidth.
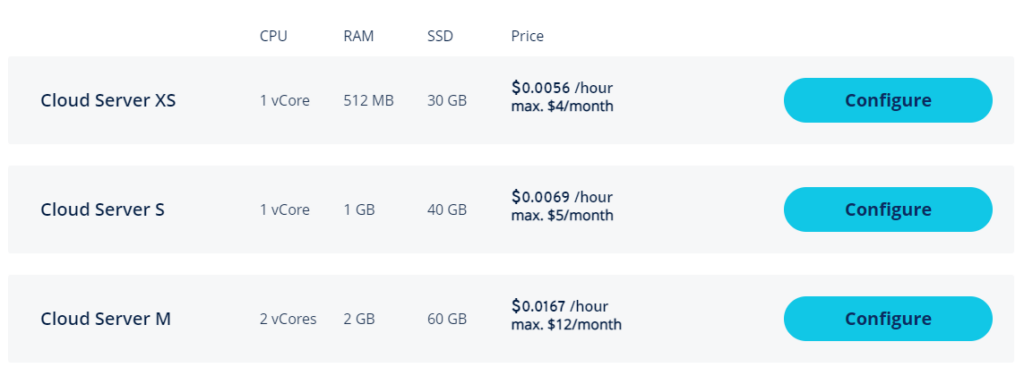
- Virtualized Server (Cloud Server or VPS). A virtualized server will take out the equation of hardware failures, as the provider also employs the admins to check hard disk health and perform migrations. This has the added benefit of only focusing on software config & maintenance.
A setback to virtualized servers is that they will be more expensive than dedicated servers for the same resources. Another setback is that the provider may decide to upgrade, migrate, or change IPs on their own schedule, causing short outages (1-2 hours every so many years), perhaps at times undesirable for your business.
An IONOS VPS and Cloud Server operate fundamentally the same, however, the Cloud Server has additional benefits such as adding more than one server per contract for load balancing, as well as customizing the specific CPU, RAM, and SSD.
Newer IONOS VPS contracts come with unlimited 1Gbps bandwidth, and Cloud Servers come with unlimited 400Mbps bandwidth.
Ordering with IONOS
IONOS is one of the most secure web services and was the first to incorporate the Phone PIN for its customers as an additional step of security. If you are a first-time customer, you will need to provide a valid name, email address, physical address, and billing (with enough money to clear a reservation fee). Ordering with a VPN will result in a denial. Ordering with an incomplete address will result in a denial. A first-time order approval typically takes 24-48 hours. Check your Inbox as well as Spam from emails from IONOS and possibly their Security Team if additional documentation is required for approval.
Once approved, a dedicated server (AMD or Intel) may take up to 3 days to deploy, and a Cloud Server or VPS will take ~1 hour. Once deployed, you will receive login details in your IONOS Cloud Panel.
A Note on Custom Name Servers
In order to register your own name servers (Glue records) with IONOS, you are required to have two different IP addresses. The purpose of this is for server redundancy, which is always ideal. In an ideal setup, you have two servers, in two different data centers, on two different accounts/providers. Even better, your Master DNS runs on a third server pushing to your Slave DNS servers. In the world of servers, you can always do more to better prepare against disaster, but for the sake of simplicity, we are keeping this basic: one IP, one server.
It’s recommended to use the IONOS name servers, since they are free to use, it doesn’t require an extra IP, and there is 4x redundancy. However, if you really want to use your own custom name servers you can get away with registering a second IP address ($5/month) and configuring it to the same server.
The added benefits in using your own name server are aesthetics (white labeling your hosting) and not having to manually copy over DNS records to an external name server as domains are added to your server. This can save a lot of time if your hosting multiple domains.
Time To Get Started
Accessing Plesk and Adding Domain
Access your IONOS Cloud Panel, and click on your server (under Infrastructure > Servers) to display the Plesk Admin area login.
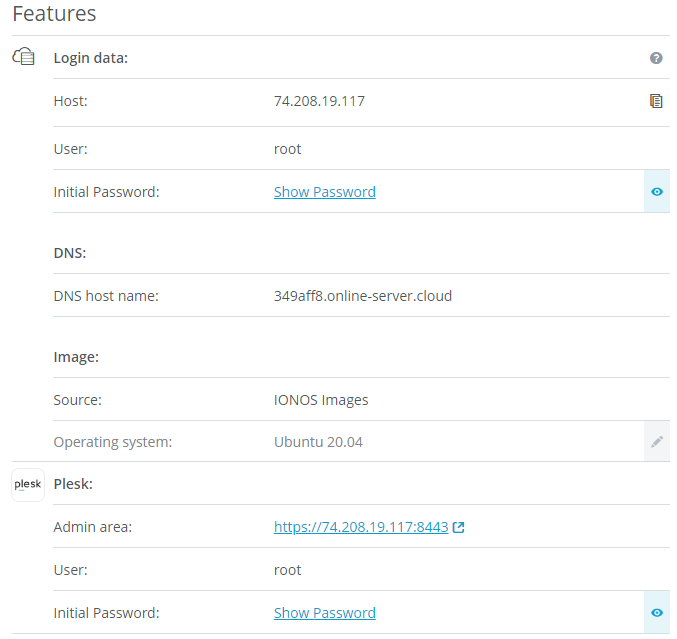
It’s likely that your web browser will warn you that the SSL key is not valid, and this is normal. Click Advanced > Continue anyway. An SSL key can only be validated for a domain name, not an IP address, however the connection really is still encrypted.
Accept the End User Agreement License, then from the list on the left click on Domain > Add Domain. You can start with a ‘Blank website’, input your registered domain name, and leave the default to ‘Create a new subscription’.
If IONOS is your registrar, you can add DNS in your IONOS control panel. If it is not, you can still add an external domain to use the IONOS name servers for free. Otherwise, pointing DNS from any third-party name server is totally fine, and you do not have to have the domain within your IONOS control panel or account.
Configuring Your Own Name Server (optional)
If you opted in for using your own domain’s custom name servers, first you will need to add a New IPv4:
- Login to the IONOS Cloud Panel
- On the left, click Network > Public IP > Create.
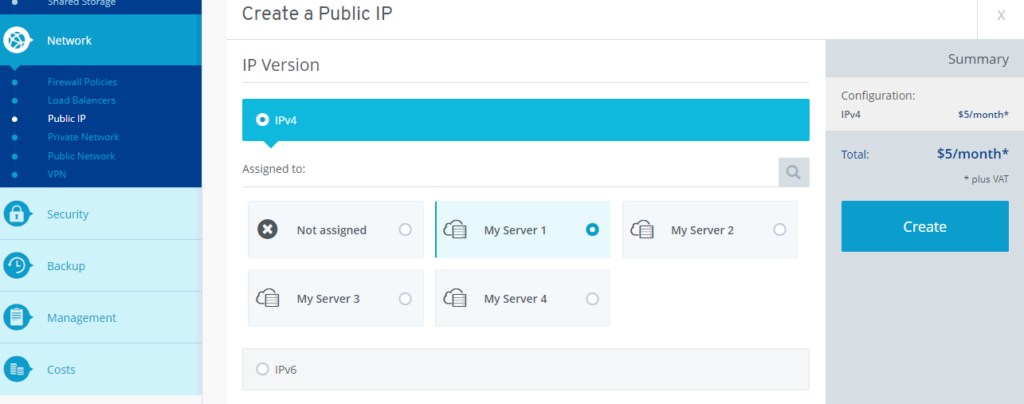
- Wait 1-5 minutes for IP to configure and be added to the same firewall policy.
- Next, add the public IPv4 address to the server OS networking config:
https://www.ionos.com/help/index.php?id=2149 - Login to your Plesk server.
- Go to Tools & Settings > IP Addresses > Reread IP.
If Plesk fails to read the new IP, you can click Add IP Address to manually add: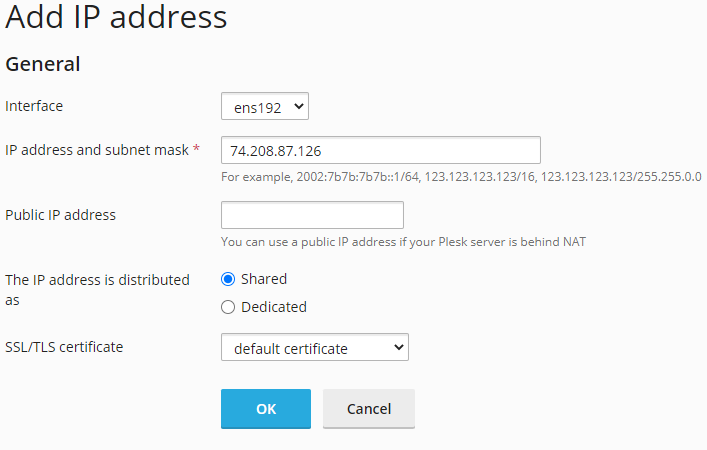
Change IP address from ‘Dedicated’ to ‘Shared’ so that all domains can use it. - You can do an external nmap scan to confirm the new IP is being read, or use Xellix.
- Specific to Plesk, only one IPv4 can be used per domain/subscription.
- Update the DNS Template so that all domains on the server use your custom name servers. Head over to Tools & Settings > DNS Settings. Update the two NS records from
ns1.<domain>.andns2.<domain>.tons1.yourdomain.comandns2.yourdomain.com, being sure to match the correct IPs. Click Apply DNS Template Changes.
Next, you need to update/register the name servers as Glue records at your registrar. If IONOS is your registrar:
- Login to your IONOS control panel.
- Go to Menu > Domains & SSL.
- Click on the gear icon in the right column next to your domain name, and choose Name servers.
- Click ‘Use Custom Name Servers’ and enter your corresponding name servers and IP addresses. Click Save.
Use a WhoIs lookup to confirm the name servers are registered: https://www.whois.com/whois/ .
You will be required to open port 53 for TCP and port 53 for UDP connection within your IONOS Cloud Panel to allow the name server to resolve, so we will do this and query DNS later.
Updating Hostname
Currently, your server’s hostname will contain a silly weird-name.serverip.plesk.page. Let’s update this in Plesk under Tools & Settings > Server Settings. Update the ‘Full hostname’ to match a domain or subdomain that you will be pointing to this server and click OK.
Then, you can update the DNS records for all domains to reflect this change. Tools & Settings > DNS Settings > Apply DNS Template Changes > Apply the changes to all zones > OK.
Adding The IPv6 (optional but encouraged)
Back in the IONOS Cloud Panel, click on Network > Public IP > Create. Under ‘IP Version’ be sure to select IPv6 and choose your server to be assigned to.
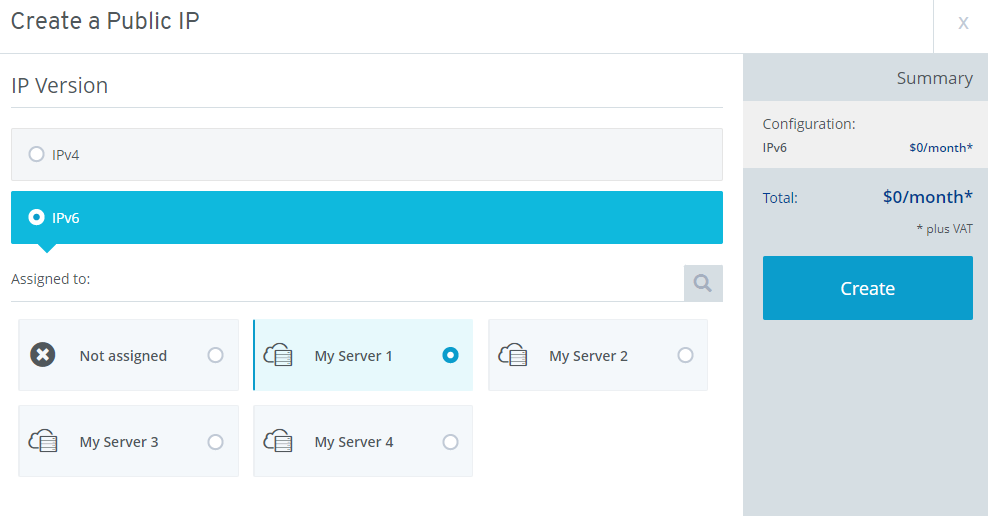
Allow 1-5 minutes for IPv6 to be configured.
Next, add the public IPv6 address to the server OS networking config:
https://www.ionos.com/help/index.php?id=2140
In Plesk go to Tools & Settings > IP Addresses > Reread. If the IPv6 does not successfully get seen, manually add instead by clicking Add IP Address.

If you’re using Plesk as your name server: Plesk has difficulty adjusting the DNS template automatically for IPv6, so instead we have to manually enter it. Go to Tools & Settings > DNS Settings. Click on the <domain>. next to the AAAA record:
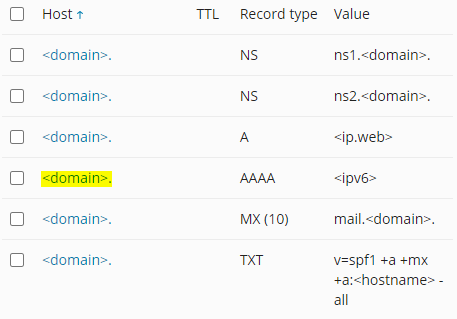
Manually enter your IPv6 address and click OK. Now do the same for the rest of the AAAA records in DNS Settings.
At the top of the page, click the button ‘Apply DNS Template Changes’ > ‘Apply the changes to all zones.’ > OK. Now you can check out your domain’s DNS (Domains > yourdomain > Hosting & DNS > DNS Settings) to confirm the IPv6s are listed.
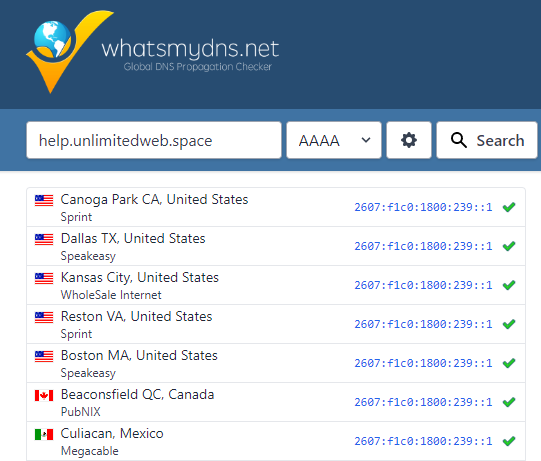
Use an external DNS checker such as WhatsMyDNS to confirm the IPv4 as well as IPv6 are being seen around the world.
Pointing DNS
If you’ve opted for using IONOS name servers, or using third-party name servers (i.e. Cloudflare or GoDaddy) you will now need to point all DNS to your server. Update your DNS records for your domain using the following:
| Record Type | Purpose | What To Enter |
| A | Points to the HTTP(S) server via IPv4. This tells a domain where the web hosting and SSL will be connected to. | Host Name: @, www, mail, webmail and any subdomains Value: The IP address of your server |
| AAAA (optional) | Points to the HTTP(S) server via IPv6. This tells a domain where the web hosting and SSL will be connected to. This is only used if you’ve added an IPv6 address to the server. | Host Name: @, www, webmail and any subdomains Value: The IPv6 address of your server |
| MX | Points to the mail server. This tells a domain where to receive incoming mail. | Host Name: @ Value: mail.yourdomain.com |
| TXT (SPF) | “SPF (Sender Policy Framework) is a system that ensures emails are genuine by comparing them against a TXT list of approved senders.“ | Host Name: @ Value: v=spf1 a mx a:yourdomain.com -all |
| TXT (DMARC) | “The DMARC policy defines how the receiver should treat email messages depending on the results of DKIM and SPF checking.” | Host Name: _dmarc Value: v=DMARC1;p=reject;rua=mailto:admin@abc.com Update the admin@abc.com to an email address for receiving delivery reports. |
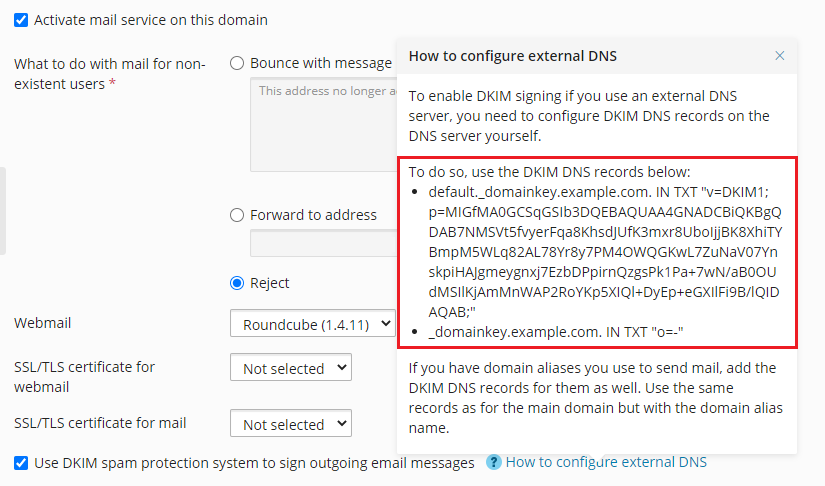
| TXT (DKIM) | Host Name: default._domainkey.example.com Value: v=DKIM1;p=… Host Name: _domainkey.example.com Value: o=- Both of these values are found within your Plesk server under Websites & Domains > your domain > the ‘Mail’ tab > Mail Settings > ‘How to configure external DNS’ hint |
An example of finding the DKIM records:
Here’s a quicklink for accessing IONOS DNS settings for your domain. Only applicable if you’re using the IONOS name servers. New records are added by clicking the ‘Add record’ button.
If you’ve instead opted for using your own custom name servers, you don’t have to manually point DNS.
Set the Reverse DNS (PTR)
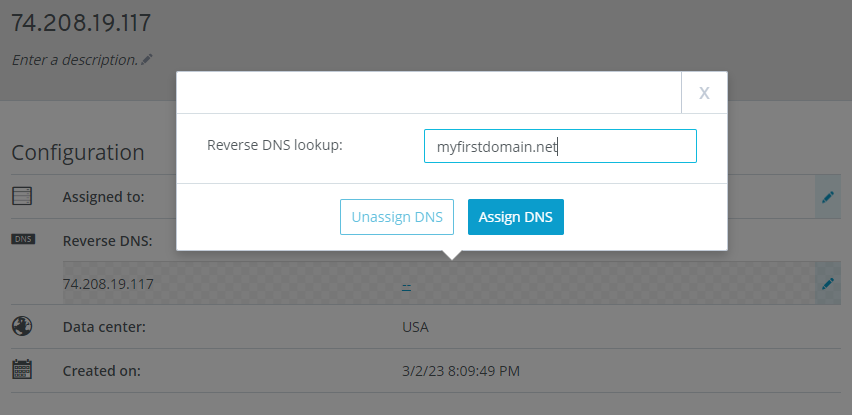
In the IONOS Cloud Panel, click Network > Public IP. Click on your IP address, scroll down, and click on your IP address under Reverse DNS. Enter your domain name as the record and click Assign DNS.
Editing the Firewall Policy
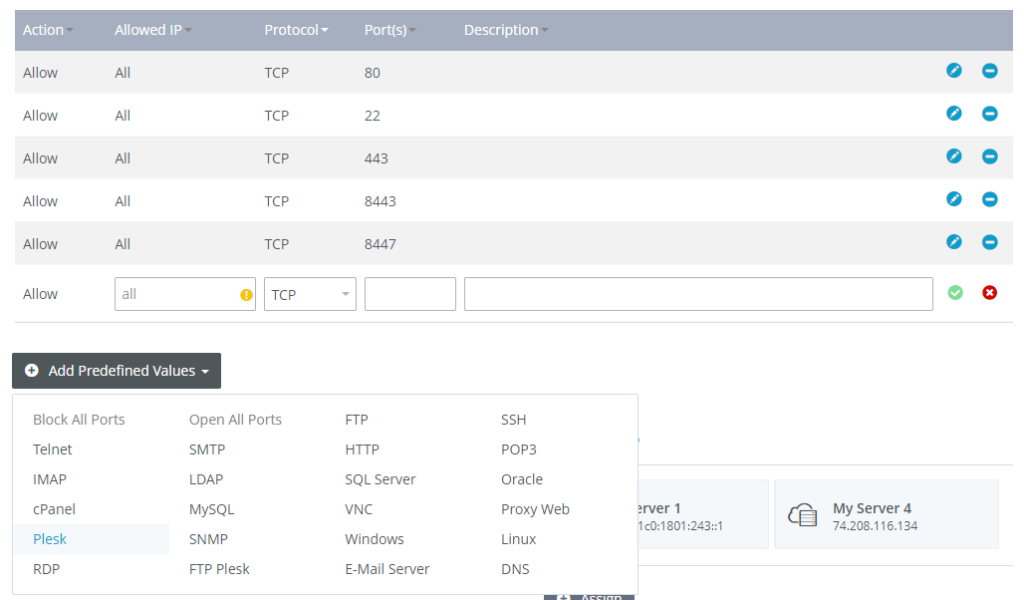
In the IONOS Cloud Panel, go to Network > Firewall Policies. Click on your firewall policy (should only be one at this point). Scroll down to see the ports that are allowed to access your server. By default, only some bare minimum ports are allowed. The ICMP protocol is not added by default, which means that your server cannot be pinged–which in turn can prevent some malicious bots from discovering your server.
Now, to add the required email ports, click on the button underneath ‘Add Predefined Values’. From this list, choose E-Mail Server. This will autofill your SMTP/IMAP/POP3 ports: 25, 110, 143, 465, 587, 993, 995. Click the green checkmark on the right to add them. If you are using your own domain as your domain’s nameserver (ns1.yourdomain.com & ns2.yourdomain.com) then you will also need to add port 53 as TCP/UDP (or TCP and UDP for the newer IONOS VPS).
Contacting IONOS
For security purposes, port 25 is blocked on all new server contracts. In order to get it unblocked, you will need to contact IONOS by phone or chat.
Enabling the SMTP Server
Back in Plesk, go to Tools & Settings > Mail Server Settings. You may notice a banner like this:
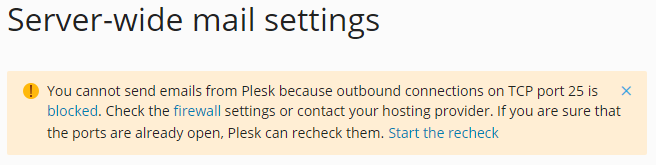
Luckily, we’ve solved this issue in the last step, so ‘Start the recheck’. Then, scroll down to and click ‘Enable SMTP service’:
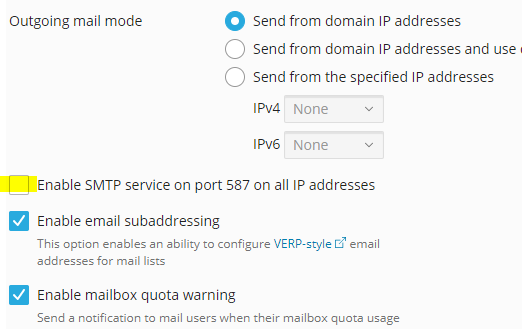
Also check ‘Fix incorrectly set sender for outgoing mail’. Scroll down to the bottom and click OK.
Enable Spam Filters
In Plesk go to Extensions. On that page, search for and click Plesk Email Security, then ‘Get It Free’. Next, go to Tools & Settings > Plesk Email Security. Click ‘Install Now’. Go to the Server Settings tab and change Spam score to ‘Medium threshold’. Change Spam action to ‘Block’. Click Save.
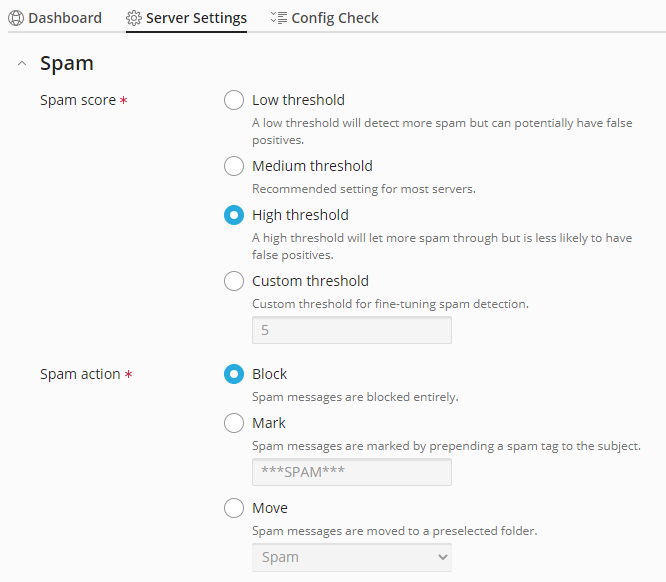
This will filter incoming and outgoing email for spam.
The Final Tests
Head over to MXToolbox’s SMTP Diagnostics test. Input your domain name and click Test Email Server.
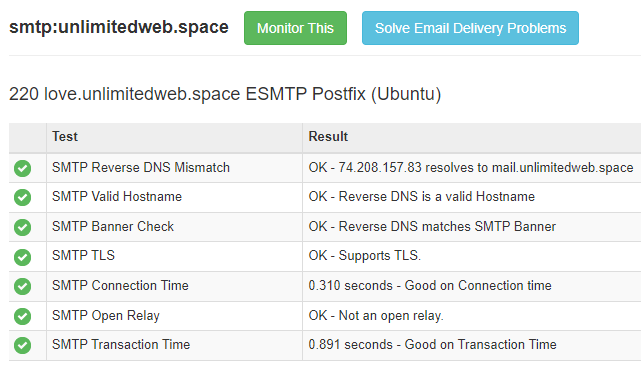
As long as everything went well, you will pass with all green checkmarks.
Now it’s time to send your first successful email!
Further Reading
Plesk offers several comprehensive guides as well as even a Plesk University course to fully learn the ins and outs of server management. Any good mail server admin should at the very least read these two guides in entirety: