For the best server quality, deals, and 24/7 tech support -- I recommend IONOS.
If you’re administering a dedicated server, it’s important to check hard drive health on a regular basis. HDD drives use an older technology and die sooner than SSD drives, which are newer–but not as new as NVMe SSD which are touted to last even longer.
Unable to Access Server
Windows Filesystem Checks in Local
Windows Hard Disk Checks in Local
Windows Hard Disk Checks in WinRE
Linux Hard Disk Checks in Local
Linux Filesystem Checks in Rescue
Linux and Windows Hardware (Hard Disk) Checks in Linux Rescue
Server Not Responding
If your server is not responding remotely to an SSH (Linux) or Remote Desktop (Windows) connection, first you want to troubleshoot networking as a point of disconnect. First things first, find out if your server is responding to a VNC console, KVM console, Remote console, or serial console provided by your host.
IONOS Remote Console (new VPS): https://www.ionos.com/help/index.php?id=5341
IONOS KVM Console (Cloud Servers): https://www.ionos.com/help/index.php?id=2303
IONOS VNC Console (Dedicated Servers): https://www.ionos.com/help/index.php?id=2291
IONOS Legacy/Value Servers offer Serial Console connection information under Servers & Cloud. Windows Servers can access Command Prompt following this guide: https://www.ionos.com/help/index.php?id=1870
If your server is responding normally within the console, it’s likely your issue is network configuration related (or firewall) and not file system or hardware related. Refer to your operating system’s documentation.
Checking Windows File System
Repairing System Files
You may either run DISM and SFC in your local operating system, or the Windows Rescue Environment (WinRE) if the local system is unavailable. CHKDSK must be ran in the rescue system, or set to auto run on bootup.
Booting into WinRE
Booting an older/legacy/deal IONOS Windows Server into WinRE
Booting an IONOS dedicated server managed in Cloud Panel into WinRE
Access Command Prompt from WinRE:
- On the Install Windows screen, select Next > Repair your computer.
- On the System Recovery Options screen, select Next > Command Prompt.
You can identify the OS drive letter by entering the command:
BCDEditDISM
Deployment Image Servicing and Management (DISM) is a command-line tool that can be used to service and repair Windows.
First, run the Deployment Image Servicing and Management (DISM) tool.
Open command prompt: In Windows search bar type in ‘command’ to find Command Prompt, right click Command Prompt > Run as administrator.
Type the following command and press Enter:
DISM /Online /Cleanup-image /RestorehealthIf your Windows Update utility used to restore from DISM is corrupted, you will need to repair from a Windows DVD instead.
SFC
Open an elevated Command Prompt if you haven’t already (In Windows search bar type in ‘command’ to find Command Prompt, right click Command Prompt > Run as administrator).
Type the following command and press Enter:
sfc /scannowThis will scan and replace all corrupted system files.
Repairing Logical Errors and Checking for Physical Errors
CHKDSK
Boot into the Windows Rescue Environment (WinRE).
Type the following command and press Enter:
chkdsk c: /rThis will locate bad sectors, recover readable information, fix errors, and check for physical degradation. Run the same for each drive that exists (excluding network drives). Chkdsk will return an Exit Code once finished. 0 means no errors were found, 1 means errors were found and automatically fixed. Any other errors may require additional research.
WMI Command-line Utility
Open an elevated Command Prompt (In Windows search bar type in ‘command’ to find Command Prompt, right click Command Prompt > Run as administrator).
Type the following command and press Enter:
wmic diskdrive get statusUnder the “Status” column, confirm that the result is OK. If the status reads OK, everything is working as expected. If the status reads “bad,” “unknown,” or “caution,” it’s likely that the hard drive has an imminent hardware failure, or the command is having problems querying the status from the firmware of the drive.
Checking Linux File System
Checking For Physical Hard Drive Errors in Local
Server Logs
You can search your logs to look for specific errors that are indicative of physical hard drive issues.
dmesg | grep -i "I/O error"dmesg | grep -i "READ FPDMA QUEUED"cat /var/log/syslog | grep "Dirty bit is set"If you have any output from these commands, it’s possible you have a damaged hard drive.
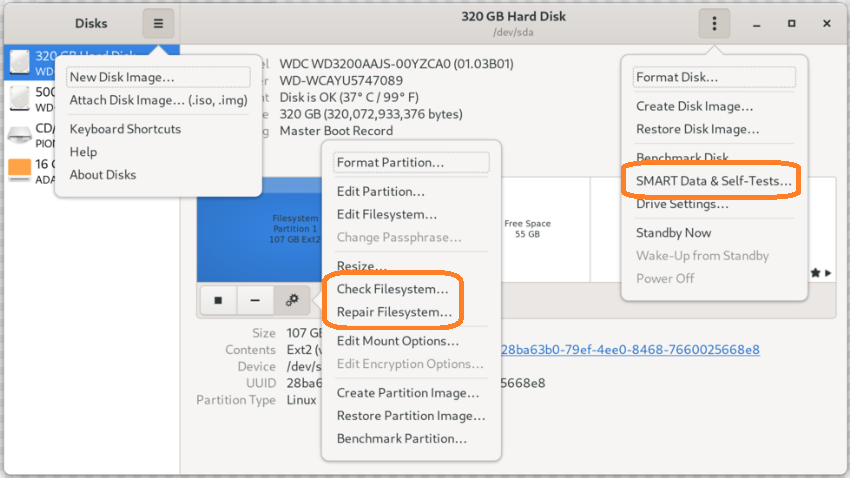
Gnome Disks SMART Self-Tests
If you have the Gnome GUI installed with Disks you can use it to check and repair the filesystem, as well as SMART tests for hard disk failure.
Checking and Repairing File System in Rescue
FSCK
You can use the tool fsck to find and fix corrupt operating system files.
In order to use fsck on a file system, it must not be mounted. For this reason, you should first boot your server into a linux rescue system. This may be something like a Debian rescue system accessed through your host’s control panel, a rescue mode accessed through the bootup menu, or a Knoppix DVD you’ve burned onto a disc or bootable USB.
After you’ve booted your server into a rescue mode/OS/DVD/USB, open a terminal, type the following command and press Enter:
fdisk -lThis will display all disks and partitions on the disks. You are specifically looking for the ‘Device’ to run fsck in the following step, not the ‘Disk’. For example, you are looking for sda1 and not sda.
fsck -y /dev/sda1Repeat for all applicable partitions.
Checking Hard Disks for All Operating Systems Using Linux Rescue
HDD & SSD Drives in Software RAID:
Boot your server into a linux rescue/live mode/CD/USB, open a terminal, type the following command and press Enter:
sudo apt update ; sudo apt install -y smartmontoolsThis will install the smartctl testing utility if it’s not already.
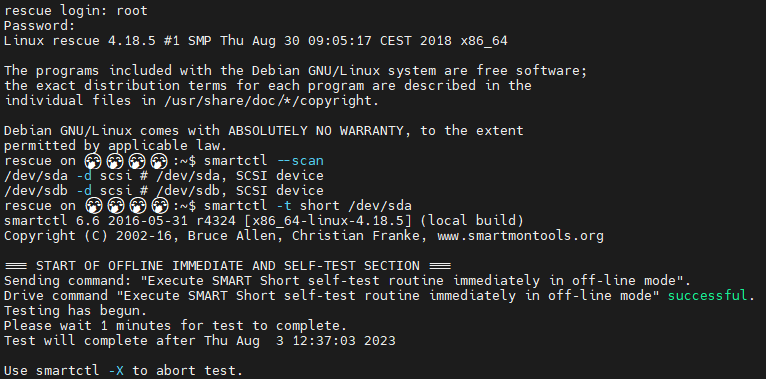
Find out the name of the disks you can test by running the following command:
smartctl --scanAssuming no error, you can perform a smartctl test on the disk you’ve found in the last step:
smartctl -t short /dev/sdaReplace /dev/sda with one of the drives found in the last step. Usually the output of this command will tell you how long it will take to run the test in the background.
Wait until after this test completes to run the following to output results:
smartctl -a /dev/sdaAgain, replacing with the correct drive location & letter.
Toward the bottom of the output would be any errors that were logged. Any more than 0 errors is problematic and indicative of a dying drive that needs to be replaced. It’s advisable to mount your partitions to backup data immediately.
Repeat smartctl tests for all additional drives.
If an error pops up when trying to run smartctl tests, it’s possible that your hard drives don’t support SMART tests. In that case, you’ll want to refer to the manufacturer’s documentation for the correct tools to install and run to diagnose hard drive health.
HDD & SSD Drives in Hardware RAID:
Some hardware RAID controllers are supported by smartmontools (smartctl tests). Others, you will need to refer to your specific manufacturer’s documentation for the proper tools and tests.
To find out which hardware controller is used, put the server into a rescue mode/OS/DVD/USB and run:
lspci | grep RAIDHere’s a table of controllers supported by smartctl and their commands:
| Manufacturer | Hard Disk # | Command |
| Areca SATA[/SAS] RAID controller | 1 | smartctl -iHAl error /dev/sg1 -d areca,1 |
| Areca SATA[/SAS] RAID controller | 2 | smartctl -iHAl error /dev/sg1 -d areca,2 |
| LSI 3ware SATA RAID controller | 1 | smartctl -iHAl error /dev/twe0 -d 3ware,0 |
| LSI 3ware SATA RAID controller | 2 | smartctl -iHAl error /dev/twe0 -d 3ware,1 |
| Adaptec SAS RAID controller (devices using aacraid driver) | 1 | smartctl -iHAl error /dev/sg2 -d sat |
| Adaptec SAS RAID controller (devices using aacraid driver) | 2 | smartctl -iHAl error /dev/sg3 -d sat |
| Dell PERC 5/i,6/i controller | 1 | smartctl -iHAl error -d sat+megaraid,0 /dev/sda |
| Dell PERC 5/i,6/i controller | 2 | smartctl -iHAl error -d sat+megaraid,1 /dev/sda |
| LSI MegaRAID SAS RAID controller | 1 | smartctl -iHAl error -d sat+megaraid,0 /dev/sda |
| LSI MegaRAID SAS RAID controller | 2 | smartctl -iHAl error -d sat+megaraid,1 /dev/sda |
Reading smartctl Output
In the output, you should see a SMART Attributes with Thresholds table.
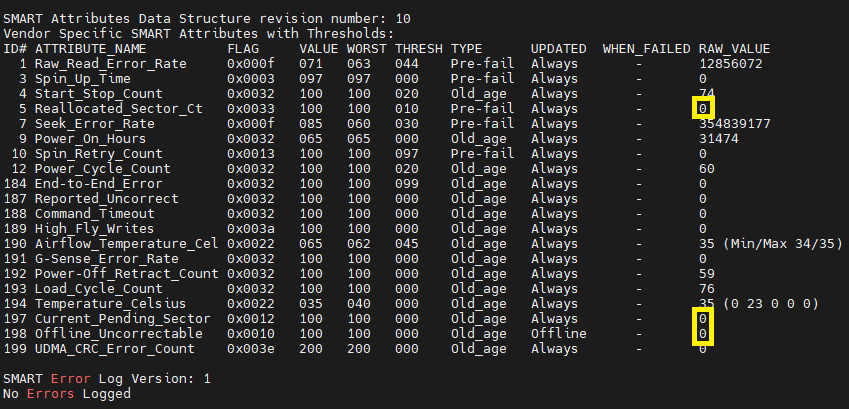
The fields we are most-concerned with are Reallocated_Sector_Ct, Current_Pending_Sector, and Offline_Uncorrectable. Any value other than 0 in the RAW_VALUE column would indicate inevitable drive failure.
Alternatively, or if smartctl doesn’t work or your controller is not supported, you can refer to the manufacturer’s documentation for testing drives.
Here are a few common controllers and their tools & commands:
Broadcom Controller
Update and install required tools:
sudo apt update ; sudo apt install -y wget unzipDownload the StorCLI tool:
wget "https://help.unlimitedweb.space/extra-files/StorCLI_007.2508.0000.0000.zip"Unzip & install:
unzip StorCLI_007.2508.0000.0000.zip; cd StorCLI_007.2508.0000.0000; unzip Unified_storcli_all_os.zip; cd Unified_storcli_all_os/Ubuntu; dpkg -i storcli_007.2508.0000.0000_all.debDisplay info about controller:
storcli64 /c0 show allDisplay info about disks:
storcli64 /c0/eall/sall showDisplay info about state of disks:
storcli64 /c0/eALL/sALL show allDisplay logs:
storcli /cx show eventloginfoAny more than 0 errors is problematic and indicative of a dying drive that needs to be replaced. It’s advisable to mount your partitions to backup data immediately.
Download: StorCLI_007.2508.0000.0000.zip
DELL PERC Controller
Update and install required tools:
sudo apt update ; sudo apt install -y wgetDownload the perccli64 tool:
wget "https://help.unlimitedweb.space/extra-files/PERCCLI_7.2313.0_A14_Linux.tar.gz"Unzip & install:
tar -xzf PERCCLI_7.2313.0_A14_Linux.tar.gz; cd PERCCLI_7.2313.0_A14_Linux; dpkg -i perccli_007.2313.0000.0000_all.debDisplay information about drive #1:
perccli64 /c0/e32/s0 show allDisplay information about drive #2:
perccli64 /c0/e32/s1 show allDisplay more information about disks:
perccli64 /c0 showDisplay logs:
perccli /c0 show eventloginfoAny more than 0 errors is problematic and indicative of a dying drive that needs to be replaced. It’s advisable to mount your partitions to backup data immediately.
Download: PERCCLI_7.2313.0_A14_Linux.tar.gz
NVMe Drives:
Boot your server into a linux rescue mode/OS/DVD/USB, open a terminal, type the following command and press Enter:
sudo apt update ; sudo apt -y install nvme-cliThis will install the NVMe testing utility if it’s not already.
Find out the name of the disks you can test by running the following command:
fdisk -lThis will display all disks and partitions on the disks. You are specifically looking for the ‘Disk’ to run the test in the following step, not the ‘Device’. For example, you are looking for nvme0n1 and not nvme0n1a.
Now you can perform a test on one of the disks:
nvme device-self-test -s 1h /dev/nvme0n1Replace /dev/nvme0n1 with one of the drives found in the last step.
After about two minutes, run the following command to display results:
nvme self-test-log /dev/nvme0Again, replacing with the correct drive location & number.
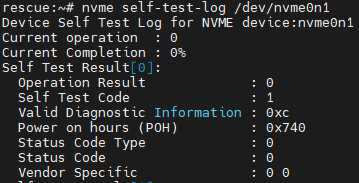
Taking a look at the Operation Result output, you can determine:
| Operation Result # | Meaning |
| 0 | Operation completed without error |
| 1 | Operation was aborted by a device self-test command |
| 2 | Operation was aborted by controller level reset |
| 3 | Operation was aborted due to a removal of a namespace from the namespace inventory |
| 4 | Operation was aborted due to the processing of a format NVM command |
| 5 | A fatal error or unknown test error occurred |
| 6 | An unknown segment has failed – probable failure |
| 7 | One ore more failed segments – probable failure |
| 8 | Operation was aborted for unknown reason |
| 9 | Operation was aborted due to a sanitize operation |
Any output other than 0 is problematic. 6 and 7 are likely indicative of a dying drive that needs to be replaced. It’s advisable to mount your partitions to backup data immediately.
Repeat tests for all additional drives.